Mar 25, 2016

ORA-00600: error in Queue Table SYS.SYS$SERVICE_METRICS_TAB

I found below ORA-600 in my RAC production database of version 11.2.0.4+PSU7. From the Oracle documents, I did the following and floating of ORA-600 is stopped completly.

Verify the following:

- alert_PROD1.log
- PROD1_q002_7930002.trc


"alert_PROD1.log" shows an ORA-00600 [kwqitnmphe:ltbagi] here:
---
Fri Mar 25 13:43:49 2016
Errors in file /u01/app/oracle/diag/rdbms/prod/PROD1/trace/PROD1_q000_10682516.trc (incident=40305):
ORA-00600: internal error code, arguments: [kwqitnmphe:ltbagi], [1], [0], [], [], [], [], [], [], [], [], []
Incident details in: /u01/app/oracle/diag/rdbms/prod/PROD1/incident/incdir_40305/PROD1_q000_10682516_i40305.trc
Use ADRCI or Support Workbench to package the incident.
See Note 411.1 at My Oracle Support for error and packaging details.
..............................
..............................


Verify the "PROD1_q000_10682516.trc" and "PROD1_q000_10682516_i40305.trc" files.


Trace file /u01/app/oracle/diag/rdbms/prod/PROD1/trace/PROD1_q000_10682516.trc
Oracle Database 11g Enterprise Edition Release 11.2.0.4.0 - 64bit Production
With the Partitioning, Real Application Clusters, Automatic Storage Management, OLAP,
Data Mining and Real Application Testing options
ORACLE_HOME = /u01/app/oracle/11.2.0/db_home
System name: AIX
Node name: rac01
Release: 1
Version: 7
Machine: 00F9D98B4C00
Instance name: PROD1
Redo thread mounted by this instance: 1
Oracle process number: 38
Unix process pid: 10682516, image: oracle@rac01 (Q000)


*** 2016-03-25 13:43:49.018
*** SESSION ID:(579.19) 2016-03-25 13:43:49.018
*** CLIENT ID:() 2016-03-25 13:43:49.018
*** SERVICE NAME:(SYS$BACKGROUND) 2016-03-25 13:43:49.018
*** MODULE NAME:(Streams) 2016-03-25 13:43:49.018
*** ACTION NAME:(QMON Slave) 2016-03-25 13:43:49.018

Incident 40305 created, dump file: /u01/app/oracle/diag/rdbms/prod/PROD1/incident/incdir_40305/PROD1_q000_10682516_i40305.trc
ORA-00600: internal error code, arguments: [kwqitnmphe:ltbagi], [1], [0], [], [], [], [], [], [], [], [], []

kwqitmmit during kwqitmmit:time mgr IOT proc: Error 600 in Queue Table SYS.SYS$SERVICE_METRICS_TAB
kwqicaclcur: Error 600
Cursor Session Number : 580
Cursor Session Serial : 3
Cursor Pin Number : 24585
kwqitmmit during kwqitmmit:end proc: Error 600 in Queue Table SYS.SYS$SERVICE_METRICS_TAB
kwqitptm: error 600 encountered during serving 13593

*** 2016-03-25 13:43:51.148
ORA-00600: internal error code, arguments: [kwqitnmphe:ltbagi], [1], [0], [], [], [], [], [], [], [], [], []
OPIRIP: Uncaught error 447. Error stack:
ORA-00447: fatal error in background process
ORA-00600: internal error code, arguments: [kwqitnmphe:ltbagi], [1], [0], [], [], [], [], [], [], [], [], []


Action plan:

1) If you are upgrading :

Drop the queue table -

exec dbms_aqadm.drop_queue_table( queue_table=>'SYS.SYS$SERVICE_METRICS_TAB', force => TRUE)

select object_name, object_type from dba_objects where object_name like '%SYS$SERVICE_%'; ----> no rows should be returned.

Follow the below steps to recreate them.

SQL>STARTUP UPGRADE

SQL>@$ORACLE_HOME/rdbms/admin/catproc.sql

SQL>@$ORACLE_HOME/rdbms/admin/utlrp.sql

SQL>@$ORACLE_HOME/rdbms/admin/utlrp.sql

select object_name, object_type,status from dba_objects where object_name like '%SYS$SERVICE_%';

If the script fails to create the queue, please let us know so that we may recreate it manually.

2) If it is comming in production, then take downtime and do the following:

 Drop the queue table -

exec dbms_aqadm.drop_queue_table( queue_table=>'SYS.SYS$SERVICE_METRICS_TAB', force => TRUE)

select object_name, object_type from dba_objects where object_name like '%SYS$SERVICE_%'; ----> no rows should be returned.

Follow the below steps to recreate them.

SQL>STARTUP

SQL>alter system enable restricted session;

SQL>@$ORACLE_HOME/rdbms/admin/catproc.sql

SQL>@$ORACLE_HOME/rdbms/admin/utlrp.sql

SQL>@$ORACLE_HOME/rdbms/admin/utlrp.sql

SQL>alter system disable restricted session;

Thanks .

Tnsping takes long time oracle 11g After configuring 3 SCAN ip in DNS

Platform: IBM AIX 6.1 / 7.1

Issue Describe:

Recently I configured three SCAN IPs in my DNS. After than I observed tnsping to same database service in same server of all nodes taking significant/ log time to resolve. I go through lots of documents but I did not find any solution. i.e., All solution was there except one OS level .conf file.

Change the below file and the line after commenting the same. This resolved the issue.

# vi /etc/netsvc.conf
...
hosts = local, bind4

...

Note: Don't change any other values.

Register Remote listener:

If you have not register your remote listener, then follow the below steps. 

SQL> show parameter remote_listener;

NAME                                 TYPE        VALUE
------------------------------------ ----------- ------------------------------
remote_listener                      string      hrdbprdscan:1521
SQL>

SQL> alter system set remote_listener='hrdbprdscan.oracle.com:1521' scope=both sid='*';


System altered.

SQL> SQL>
SQL>
SQL> show parameter remote_listener;

NAME                                 TYPE        VALUE
------------------------------------ ----------- ------------------------------
remote_listener                      string      hrdbprdscan.oracle.com:1521
SQL>

SQL>

Thanks .

Mar 16, 2016

Manually Adding Targets to EM Cloud control 12c

Introduction:
Oracle components that are managed and monitored by Cloud Control, such as an Oracle Database or an Oracle Web Logic Server domain, are known as “managed targets”. If the desired target is on other machine, before it can be managed, a Management Agent must first be installed on the machine the target is running on. The target itself must then be assigned to a Management Agent, thereby promoting it to managed target status. For the time being, let us assume our desired target is on the same host machine.
Cloud Control offers two modes for adding targets. Let us see each one of them in detail,

Manually adding targets:
Cloud Control allows you to manually add hosts as well as a wide variety of Oracle software and components as managed targets. When you add a target manually, you do not need to go through the process of discovery by adding the target directly. Discovering targets in this way eliminates the need to consume resources on the agent to perform discovery when it is not needed.

Login to Cloud control, and From the Setup menu located on top, select Add Target, then select Add Targets Manually.

Ensure ssh is configured for effective OMS host interaction with the agent hosts as described there.

Linux pre-requisites:

Step-1: In linux system, Change visudo setting as given below in root user:
# visudo
# add below line
%oinstall       ALL=(ALL)       ALL
# disable requiretty
#Defaults    requiretty
# set visiblepw
Defaults   visiblepw

Step -2 :
Create location structure and give grants in target database.

Step-3:
Add tnsnames.ora entry in OMS. Check ping and tnsping status. Ssh must be enabled between OMS and OMC. Add required ips in /etc/hosts of both OMS and OMC ( source and target). First add OMS host and database first ( e.g., PROD,  hostname : eh-uatdb2) and then add your target servers for monitoring and Manage.

Example :
Here I am adding Target host as outside server ( e.g., IP: 172.18.1.20, hostname : eh-preproddb1)

Follow below steps:

Create below path in target host(eh-preproddb1):

$ mkdir –p /u01/app/oracle/oms12cr2/software_library
Add host:

Setup à add targets à add targets manually à


After selecting "Add Targets Manually", below window will be displayed. Select "Add Host Targets" radio button. i.e., After adding host, then only you can configure database hosted on the added target.


Then click on "Add Host" button to proceed next step.


Then Click on +add button as shown in the dialog.


Then, in this step, add host name ( fully qualified is recommended) but not IP. 


Give OS credential details in "Named Credential " box and select "create new credential", then proceed to next.


Then Click on "Next" as shown in the dialog.

Note: If sudo is not configured, then agent deployment window will give you root.sh script to run on target host to complete configuration.

See the below image:


Now add created empty path to deploy the agent. Click next to proceed.


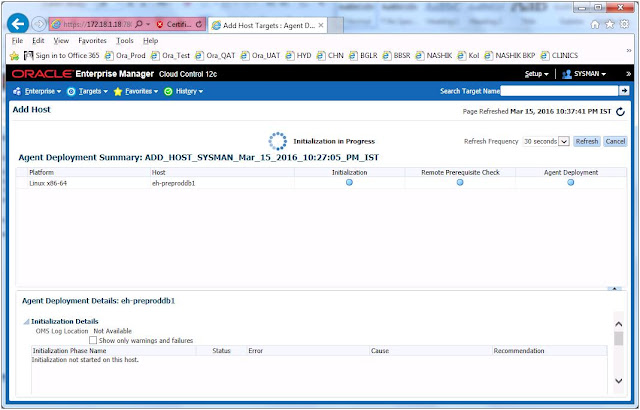
Then Click on "Deploy Agent" button as shown in the dialog.


Watch the screen. If any error come, read the error message and troubleshot. Otherwise wait till agent deployment is successful.


See, all options must be succeeded.


The above dialog box will come when agent deployment is succeeded on target host.

Now you can add database from the added host.

To Add database as Target
Add databases
Setup à add targets à add targets manually à

In the above dialog, select "Add Targets using Guided process" option. Here select " Oracle Database, Listener and Automatic Storage Management" from the drop down. Then Click on "Add using Guided Process..." Button.


Here you will find recently added host name. So select the target host from the below list shown in the dialog and click on "select" button, so that automatically the host will be added.

Now click on "Next" to discover the host and database hosted in that.

Here you select required database to add for monitoring and manage. 


Check required Check boxes.


Here it is the final step. Close this dialog. Now required database are added.
You log off and login the EM Cloud control and you can find below scree like this.


These are the steps to add host and database. In next document I will publish other management activity from Oracle EM Cloud Control 12c.

Click here to see how to install Oracle Enterprise Manager Cloud control 12c.

Thanks .

Installation of Enterprise manager 12c Cloud control

1) About Enterprise Manager Cloud control

2) Cloud control 12c installation
a.       Pre-requisites
b.      Installation steps


1)  About Enterprise Manager Cloud controlOracle Enterprise Manager 12c is a systems management framework consisting of an Oracle database, Oracle WebLogic, a J2EE application, an application development frame work 11g (ADF) administrative Web GUI, server and client side plug-ins, and a client side agent. In the context of Oracle Enterprise Manager, the Oracle database repository is named the “Oracle Management Repository” or “OMR”. WebLogic is the J2EE platform called the “Oracle Management Service” or “OMS”, that runs the Oracle Enterprise Manager 12c J2EE application. The administrative Web GUI is named Oracle Enterprise Manager Cloud Control. The client side agents are named the “Oracle Management Agents” or “OMA”. The server and client side plug-ins share a unique name for the managed product or technology. Monitored hosts are referred to as targets. All of the Oracle Enterprise Manager components are commonly referred to as Oracle Enterprise Manager (OEM) or Enterprise Manager (EM).

Oracle Enterprise Manager (OEM or EM) is a set of web-based tools aimed at managing software and hardware produced by Oracle Corporation as well as by some non-Oracle entities. It is Oracle’s integrated enterprise information technology management product line, which provides the industry’s only complete, integrated, and business-driven enterprise cloud management solution. Oracle Enterprise Manager creates business value for IT by leveraging the built-in management capabilities of the Oracle stack for traditional and cloud environments, enabling customers to achieve unprecedented efficiency gains while dramatically increasing service levels. Enterprise Manager Cloud Control is the new name for what was previously know as Enterprise Manager Grid Control. This article describes the installation of Oracle Enterprise Manager Cloud Control 12c Release 1 on Oracle Linux 6.4.
You must have installed the database home .If you have performed a default database installation you will need to de configure Enterprise Manager Database Control by runnig the following command as the “oracle” user.

Click here to download

There are several Oracle Enterprise Manager 12c design options that can employed depending on the size and critically of your Enterprise Manager enviroment. For example, for evaluations an all-in-one Oracle Enterprise Manager 12c design could be deployed with the Oracle Management Repository and the Oracle Management Service installed on a single Linux node. For small and medium sites a multiple node Oracle Enterprise Manager 12c design could be deployed with the Oracle Management Repository installed on one Linux node, and the Oracle Management Service installed on a second Linux node. If your site's target count requires two Oracle Management Services or Databases, you'll need to deploy a high availability design with two Oracle Management Services with a load balancer, and/or a second Database with RAC for the Oracle Management Repository.

Figure 1 shows a high availability Oracle Enterprise Manager 12c design with the Oracle Management Service on two Linux nodes with a load balancer, a third Linux node with the Oracle Management Repository, servicing various targets. High availability Oracle Enterprise Manager 12c designs are ideal for medium and large sites. 


2) Cloud control 12c installationa.       Pre-requisites
b.      Installation steps
 

a) Pre-requisites ( Very small size configuration) 
OS                          : for Linux Release 6 and above
Database             : 10g and above
OMS                      : Release 12c / 13c

OS Processor    : Min. 2, OS Memory : Min 6GB

Database requirements ( Minimum)
                                : SGA+PGA or memory_target = 3G
                                : Process = 300
                                : shared_pool_size=600M
                                : Redo log size = 300M

See the below Table list for details of requirements for sizing:

Table 1 shows the recommended Oracle Enterprise Manager hardware requirements for an evaluation, small, medium and large deployment.

Deployment Size
OMS Hosts
OMS 
CPU Cores
OMS RAM
OMS Storage
DB Hosts
DB CPU Cores
DB RAM
All-in-one Install
Eval < 10 agents, < 100 targets, < 3 Concurrent User Sessions
1
2
*4 GB
18 GB
1
2
6
Yes
Small < 100 agents, < 1000 targets, < 10 Concurrent User Sessions
1
2
*6 GB
18 GB
1
2
6
No
Medium >= 100, < 1000 agents >= 1000, < 10,000 targets,  > = 10, < 25 Concurrent User Sessions
1
4
*6 GB
18 GB
2 with RAC
4 for each RAC node
8
No
Large >= 1000 agents, >= 10,000 targets,  >= 25, <= 50* Concurrent User Sessions
2
4
*6 GB
18 GB
2 with RAC
8 for each RAC node
16
No
* To use BI Publisher add 1.5 GB of RAM.


Table 2 shows the minimum storage requirments for the database server hosting the Oracle Management Repository.

Deployment Size
MGMT_TABLESPACE
MGMT_ECM_DEPOT_TS
TEMP
ARCHIVE LOG AREA
Eval < 10 agents, < 100 targets, < 3 Concurrent User Sessions
15 GB
1 GB
3 GB
Off
Small < 100 agents, < 1000 targets, < 10 Concurrent User Sessions
50 GB
1 GB
10 GB
25 GB
Medium >= 100, < 1000 agents >= 1000, < 10,000 targets,  > = 10, < 25 Concurrent User Sessions
200 GB
4 GB
20 GB
100 GB
Large >= 1000 agents, >= 10,000 targets,  >= 25, <= 50* Concurrent User Sessions
300 GB
8 GB
40 GB
150 GB


Figure 2 shows the Oracle Management Agent intra component communication and data exchange.
 

Service
Default Port
Enterprise Manager Upload HTTP Port
4889 - 4898
Enterprise Manager Upload HTTPS (SSL) Port
1159, 4899 - 4908
Management Agent Port
3872
Management Repository Database Port
1521
Cloud Control Console HTTP Port
7788 - 7798
Cloud Control Console HTTPS (SSL) Port
7799 -7809
EM Domain WebLogic Admin Server HTTP Port
7001
EM Domain WebLogic Admin Server HTTPS (SSL) Port
7101 - 7200
Cloud Control Managed Server HTTP Port
7201 - 7300
Cloud Control Managed Server HTTPS (SSL) Port
7301 - 7400
WebLogic Node Manager HTTPS (SSL) Port
7401 - 7500
JVM Diagnostics Managed Server
3800
JVM Diagnostics Managed Server (SSL)
3801
Application Dependency and Performance RMI Registry Port
51099
Application Dependency and Performance Java Provider Port
5503
Application Dependency and Performance Remote Service Controller Port
55000


b) Installation steps: All basic installation steps for Linux and Oracle database to be followed as per Oracle recommendations.  Here I will show you installation steps for Oracle Enterprise Manager cloud control 12c.

I did below settings in my lab database.

1) Process:  ( based on size)
SQL> alter system set processes=500 scope=spfile;

System altered.
2) Memory:
pga_aggregate_target=1G, SGA=2G ( memory_target can be set 3G also)

SQL> alter system set shared_pool_size=600M scope=spfile;
System altered.

SQL> alter system set session_cached_cursors=300 scope=spfile;
System altered.

3) Redo size min 300MB and of 3 members atleast

ALTER DATABASE ADD LOGFILE GROUP 4 ('/u01/oradata/PROD/redo04.log') SIZE 300M;ALTER DATABASE ADD LOGFILE GROUP 5 ('/u01/oradata/PROD/redo05.log') SIZE 300M;ALTER DATABASE ADD LOGFILE GROUP 6 ('/u01/oradata/PROD/redo06.log') SIZE 300M;( dropped others)

Then, Restarted the database.

Oracle Enterprise Manager 12c Installation
Installing Oracle Enterprise Manager 12c Release 5 on Oracle Database 11.2.0.4
on Oracle Linux 6 using the Oracle Universal Installer (OUI).

Unzip all your softwares.
[oracle@eh-uatdb2 OEM_12c]$ ls -lrt
total 8675240
-rwxr-xr-x. 1 oracle oinstall       5375 Dec 26  2013 runInstaller
drwxr-xr-x. 4 oracle oinstall       4096 Jan 15  2014 bipruntime
-rwxr-xr-x. 1 oracle oinstall 1533566101 Jun 11  2015 WT.zip
drwxr-xr-x. 4 oracle oinstall       4096 Jun 11  2015 oms
drwxr-xr-x. 4 oracle oinstall       4096 Jun 11  2015 jdk
drwxrwxr-x. 2 oracle oinstall       4096 Jun 11  2015 response
drwxrwxr-x. 2 oracle oinstall       4096 Jun 11  2015 wls
drwxr-xr-x. 7 oracle oinstall       4096 Jun 11  2015 install
drwxrwxr-x. 4 oracle oinstall       4096 Jun 11  2015 libskgxn
drwxr-xr-x. 9 oracle oinstall       4096 Jun 11  2015 stage
drwxr-xr-x. 2 oracle oinstall       4096 Jun 11  2015 plugins
-rw-r--r--. 1 oracle oinstall      65014 Jun 11  2015 release_notes.pdf
-rw-r--r--. 1 oracle oinstall 1880746349 Feb 25 15:05 em12105_linux64_disk2.zip
-rw-r--r--. 1 oracle oinstall 2392965180 Feb 25 15:40 em12105_linux64_disk1.zip
-rw-r--r--. 1 oracle oinstall 3076033575 Feb 25 16:40 em12105_linux64_disk3.zip

$

$ ./ runInstaller

Now follow the below steps:


If you have configured internet access on this server, then enter your mail id and support id and password.


Give local directory to install patches.


Note: You must install all pre-requisites RMPs.

Go with Advance installation.


Note: If empty folders not found, above error message will be displayed.
Be sure “agentr5” folder is a blank folder. Otherwise above error message will come.


Weblogic User Name/pwd-  weblogic/webl0gic
Nodemanager Use Name/Pwd- nodemanager/n0demanager

( I used above password. The password must meet the requirements)


Select your OMS installation path for EM cloud control. 


Here you add your OMS database details. Must check your listener port also.


If your OMS database has EM repository, then remove them as per message shown in the error box. Follow below commands.


-        for standalone database
$ emca -deconfig dbcontrol db -repos drop -SYS_PWD  <pwd> -SYSMAN_PWD <pwd>

-        for RAC database
$ emca -deconfig dbcontrol db -repos drop -cluster -SYS_PWD  <pwd> -SYSMAN_PWD <pwd>


If you have not set minimum process value in your OMS database, then above error will come. Now you can increase your process value and bounce the database, then proceed from here.


In this step enter sysman user and agent user password. You can use like below:

Sysman pwd : sysman123, Agent password : agent123

 
Here this dialog is showing port pool. We discussed the same in above.


Click on install and follow the steps shown time to time.


Watch the progress.


Ignore I selected.


Click "Ok". Run the scripts on root.


When complete, below message will come.


After running roor.sh, then click "Close".

After selecting "close", your installation will be completed.

Now you can login through browser as displayed the URL in the above dialog.


Enter User Name : sysman and password also.

After login, below window will be displayed. 


Note : I have added few hosts, that's why this login window is showing some database names. The OEM Deployment sizes are as follows:    

  •     Small        < 100 agents < 1000 targets
  •     Medium     < 1000 agents < 10,000 targets
  •     Large        > 1000 agents > 10,000 targets
In the next publish I will share how to add hosts to manage/ monitor database hosted on the added host. Click here to see.

I hope this document will help to install EM cloud control 12c. In case of issues you can send messages via this blog.

Thanks. 

Translate >>